
One key aspect that can unlock your potential as a pianist is the proper use of piano finger chords.
It might seem like a small detail, but it can make a huge difference. Proper fingering is not just about knowing where to place your fingers, but also about understanding the best way to move them across the keys.
When you start to master the art of proper piano fingering for piano chords, you’ll see a significant improvement in your playing. Your movements will become more fluid, you’ll be able to play more complex pieces, and you’ll find a new level of enjoyment in your practice.
The Basics of fingering for piano finger chords
The basic rules of fingering for piano chords are easy to understand.
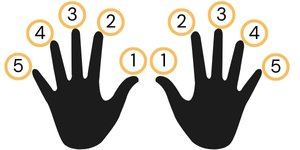
- First, remember that each of your fingers is assigned a number.
On your right hand, your thumb is 1, your index finger is 2, middle finger is 3, ring finger is 4, and pinky is 5. It’s the same for your left hand but in reverse, meaning your thumb is still 1, but your pinky is now 2, and so on.
- Thumb is the root note
When it comes to chords, a good rule of thumb is to use your thumb (finger 1) for the root note of the chord. The other fingers will naturally fall onto the other notes of the chord. This isn’t always the case, of course, as the best fingering can change depending on the context of the music.
Fingering Chords in Root Position

Printable How to play a piano chords with beautiful charts
How to play a piano chords ? What is a chord anyway ? Don’t worrry, we have designed a beginners friendly guide to help you learn the basic piano scales and elevate your piano learning.
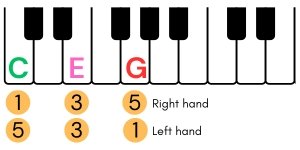
In this position, the root note of the chord, which is the note that gives the chord its name, is the lowest note.
For example, in a C major chord in root position, the notes from lowest to highest would be C, E, and G. A simple fingering for this chord on your right hand would be 1 (thumb) on C, 2 (index finger) on E, and 5 (pinky) on G. On your left hand, you’d use 5 on C, 3 (middle finger) on E, and 1 on G.
Read : Chords – Wikibooks.org
Fingering Chords in First Inversion
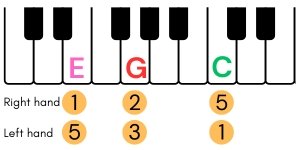
In this position, the root note is no longer the lowest note; instead, it’s the middle note.
Using the C major chord as an example again, the notes from lowest to highest in the first inversion would be E, G, and C.
- On your right hand, a good fingering would be 1 on E, 2 on G, and 5 on C.
- On your left hand, use 5 on E, 3 on G, and 1 on C.
Fingering Chords in Second Inversion

In this position, the root note is the highest note.
For a C major chord, the notes from lowest to highest in the second inversion would be G, C, and E.
- On your right hand, try using 1 on G, 2 on C, and 5 on E.
- On your left hand, use 5 on G, 3 on C, and 1 on E.
Fingering Octave Chords

These are chords where the root note is played in two different octaves at the same time. For example, in a C major octave chord, you would play C, E, and G, like in the root position, but you’d also play another C in the next octave.
- A good fingering for this on your right hand might be 1 (thumb) on the low C, 2 (index finger) on E, 3 (middle finger) on G, and 5 (pinky) on the high C.
- On your left hand, you could use 5 on the low C, 3 on E, 2 (index finger) on G, and 1 on the high C.
Remember, these are just suggestions. What’s most important is that you find the fingering that feels most comfortable and natural for you on the piano keys. Keep practicing piano finger chords, keep experimenting, and most of all, keep enjoying your journey through the world of piano chords.

You can avoid the common piano finger chords mistakes easily
When it comes to piano fingering for chords, it’s all too easy to fall into bad habits, especially when you’re just starting out.
- One of the most frequent mistakes is not using the correct fingers for the notes in a chord. It can be tempting to use whichever fingers you find easiest, but this can lead to inefficient hand movements and can make it harder to play more complex pieces later on. Always try to use the recommended fingering for each chord. It might feel awkward at first, but with practice, it will become second nature.
- Another common mistake is not using the thumb correctly. Your thumb is the strongest and most independent of your fingers, so it’s crucial to use it effectively. For most chords, the thumb should be used for the root note. This provides a stable base for the rest of your fingers.
- Incorrect hand position is another issue that can lead to problems. Your hand should be relaxed with your fingers naturally curved. If your hand is too flat or tense, it can restrict your finger movements and make it harder to play the chords smoothly.

The best tips to practice piano finger chords efficiently
- Firstly, start slow. It’s important to take your time and focus on getting the fingering right, rather than trying to play the chords quickly. Speed will come with time and practice.
- Secondly, practice regularly. Even just a few minutes of focused practice every day can make a big difference. Try to incorporate chord practice into your daily routine.
- Finally, don’t be afraid to experiment. Everyone’s hands are different, and what works for one person might not work for another. If you find the recommended fingering uncomfortable or awkward, try out some different fingerings and see what works best for you.
Remember, mastering the art of piano fingering for chords is a journey, not a destination. So be patient with yourself, keep practicing, and most of all, enjoy the process. You’re doing great!